FastPhotoReports takes a unique approach with report writing that is designed to significantly reduce report writing time while at the same time producing quality, easy to follow photo reports. With FastPhotoReports you FIRST build a report outline that consists of sections and subsections of report topics and THEN you add your actual report content (photos, text & specific client information) to the appropriate sections. This approach will assist you in developing a clear flow of information in the report and can help insure the report contains all the required topics. You can create countless report templates that are ready to go, tweaked for any reporting need. A FastPhotoReports template is simply a report that already has all of the main parts and pieces, covers, table of contents, 'canned information pages', etc. ready to go. You open up a template, give it a new report name, and then add your content. To designate any report as a template simply include the word 'template' in the report name when saving.
Before you proceed below we suggest that you take a look a the Main Screen Overview section of this guide to get familiar with the work areas of the main screen and their functions. This guide includes blue underlined hyperlinks along the way that will take to you more detailed information when clicked.
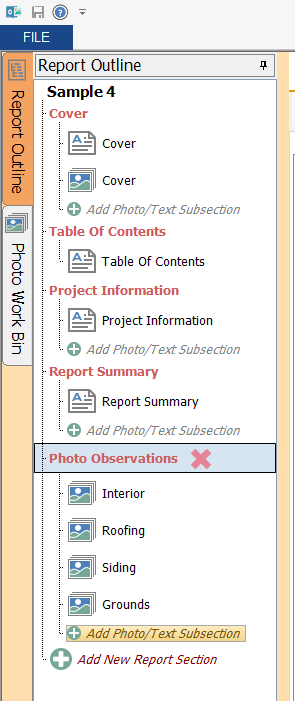
To Build your Report Outline in the Report Outline Panel:
On the left side of the main screen is the 'Report Outline' Panel which serves as a high level outline of the contents your report. You can navigate to any section or subsection of the report by clicking on it in this outline. A FastPhotoReport is comprised of report 'Sections' that serve as your
main report topics and then under each of the report sections you can add 'subsections' of either text paragraphs or photos. You use the
and the

clickable links in the Report Outline Panel to
add your sections / subsections.
Below is a example of a simple Report Outline:
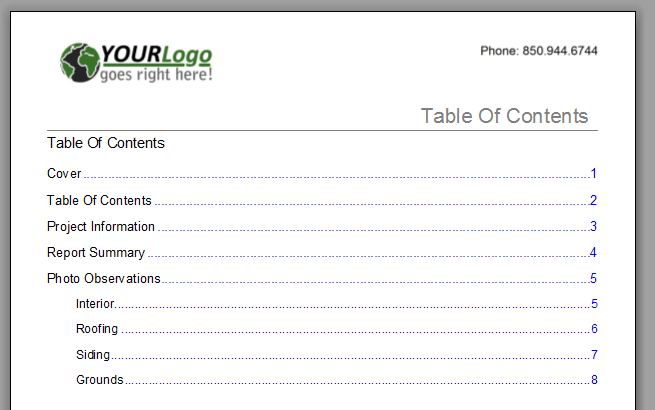
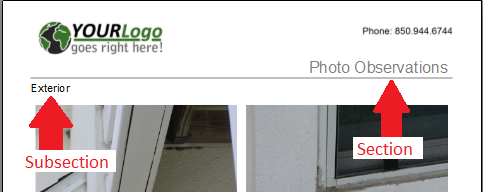
Note that the sections become the top level outline in the Table of Contents with the subsections becoming subtopics (above). The Sections and Subsections also become the Printed Titles and Subtitles on the report pages:
Utilizing this feature you can inform you client of exactly what they are looking at by simply creating a good clear report outline. Take for an example a report that included one main report Section titled 'Work In Progress' and under it several Subsections titled 'Roof', 'Siding', 'Plumbing', etc. Without any more text descriptions, simply by adding the photos to the appropriate sections you can have a great start to a report in literally a minute or to. There is a nice option in the Report Options panel to 'exclude unused' photo sections. With this option checked you can have many photo sections in your report of 'possible' topics and just add photos to the ones that apply. Photo sections that contain no photos are automatically excluded from both the report and the table of contents!
You can always insert more sections and subsections at any time. More information about features of the
Report Outline Panel Here.
There is a
Report Options panel and a
Subsection Options panel along the bottom of the main screen. You can set options for each individual subsection or for the entire report using these option tabs.
At the top center of the main screen there is a Photo View tab and a ReportView tab. The Photo View will display ALL of the photos within your report along with icons to add photos to any of the Photo subsections you have created. The Report View tab will show a preview of the entire report.
To edit any photo or text area simply click on the photo in the Photo View or the Report View. The
Photo Editor and
Text Editor on the right side of the main screen will display the selected item for editing. You can also edit the items by double clicking the item which will then be displayed in the '
Full Screen Editor' for editing. This can be helpful on smaller screen devices.
There is a refresh icon

at the top left of the Photo View / Report View tabs and also at the top left of the Photo Editor and Text Editor tool panels. Clicking the refresh icon will update the Report View to reflect the latest changes. If you desire to see changes immediately you can check the 'Fast Draft Preview' on the Report Options tab. When checked the report will be rendered more quickly as a rough 'draft' quality with changes reflected as soon as you move to a different photo. This can be helpful with large reports with many, many photos. Be sure to uncheck this option before creating your final PDF's or the pdf quality will be unacceptable. You can choose the
quality and size of the final PDF's using the dropdown also available on the Report Options tab.